![[New] Step-by-Step Approach to Crafting 3D Text in Photoshop](https://thmb.techidaily.com/cce90de001854095939cd22c7e555d9393bc0bdf8a9fe07be68597eb9b7713ab.jpg)
"[New] Step-by-Step Approach to Crafting 3D Text in Photoshop"

Step-by-Step Approach to Crafting 3D Text in Photoshop
It’s three times better than regular text. A 3D text looks more professional, more creative, and just sits better on most pieces of content. Regardless of whether you need it for an image or for one of your videos. This guide will show you how to make a 3D text effect in Photoshop.
Then, you’ll learn about an alternative method that’s actually much easier. It may not be as popular as Photoshop but you will be surprised by the professional results even a beginner can achieve with this.
Disclaimer: This post includes affiliate links
If you click on a link and make a purchase, I may receive a commission at no extra cost to you.
How to Create a 3D Text Effect in Adobe Photoshop
Photoshop is not the easiest image editing software to use. It can get really complex, really fast. But, with this, all you have to do is follow our steps. We’ll try to make it as straightforward as possible.
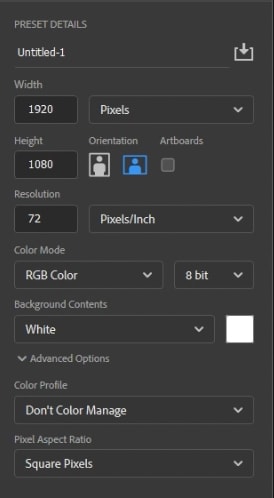
Step1 Open up Adobe Photoshop and create a New Document. Then, edit the document settings like this.
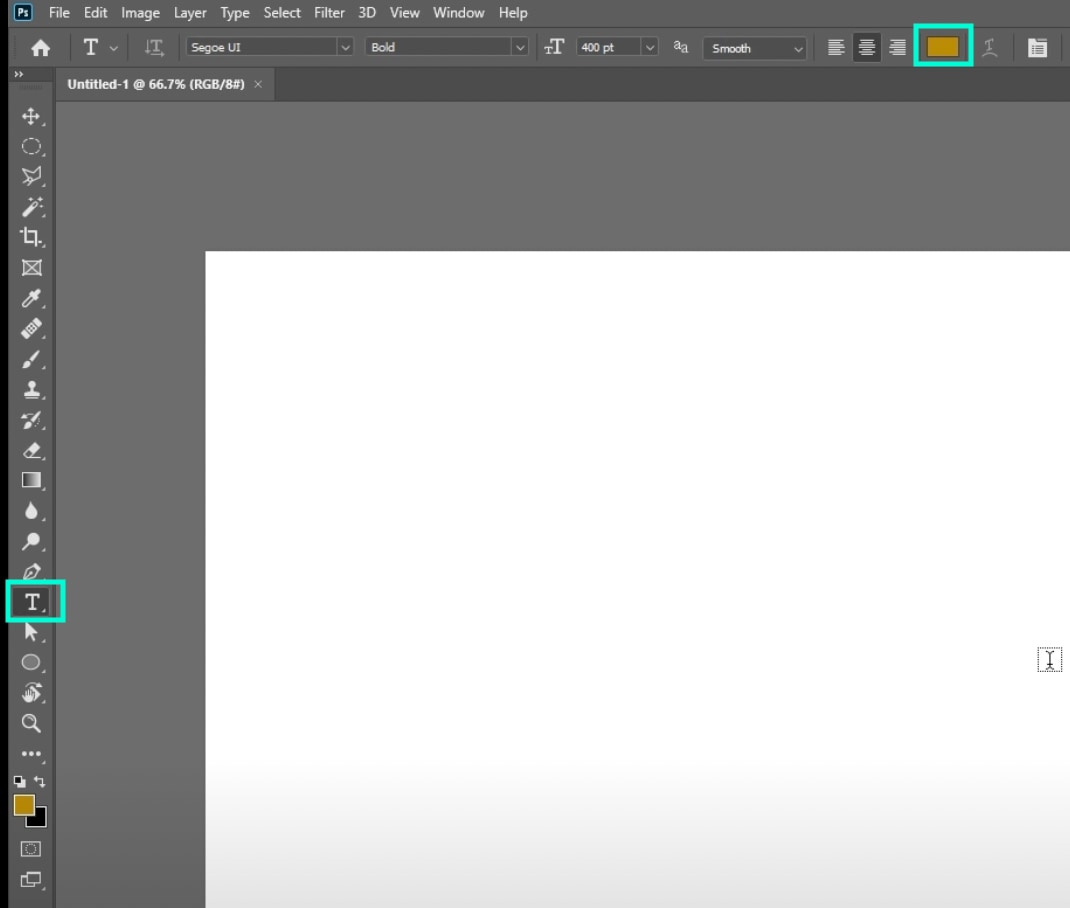
Step2 Select the Type tool and choose a color of your liking. Then, click anywhere on the blank canvas and type in your word.
Step3 Now, locate the Layers panel at the bottom-right corner of the screen. Click on Layers → right-click on your Text layer → select “New 3D Extrusion from Selected Layer”. Then, just click Yes on the new window that pops up.

Step4 You are now editing in the 3D Workspace inside Photoshop. Here is where we will create the 3D text effect. First, click on the Layers panel → right-click on “Background” → select “Postcard”.
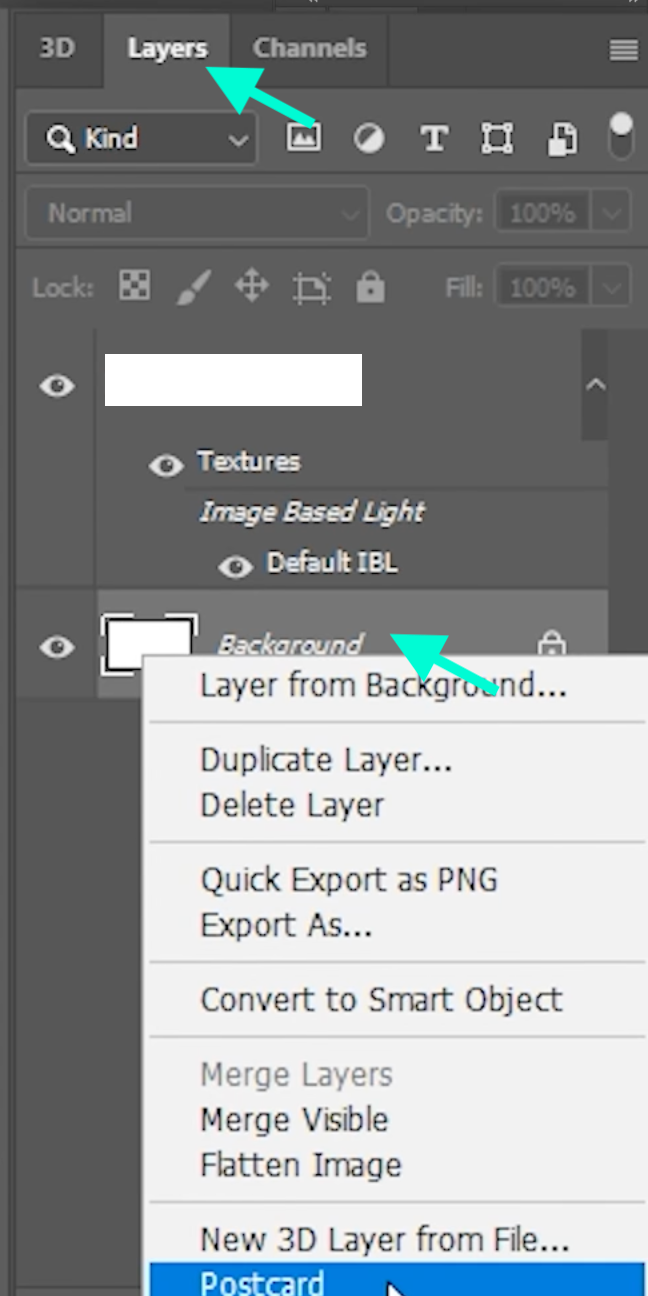
Step5 Now, without touching anything else, hold on to the SHIFT key and click on your text layer. This will select the text and background layer at the same time. Then, just hold on CTRL + E / Cmnd + E. This will merge the two layers.
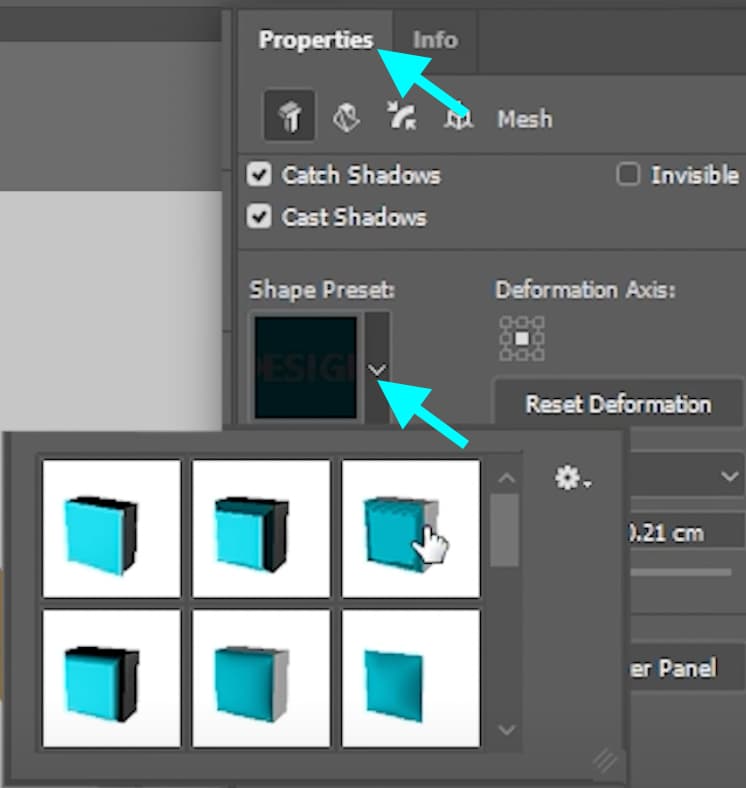
Step6 Next, go to the 3D panel. Here, simply click on your Text layer. Then, from the Properties panel above, select a Shape Preset to be applied to your current text.
Step7 The next thing you need to do is add a light source. To do this, go back to the 3D Panel → click on the Lightbulb button at the bottom → select “New Infinite Light”. Then, you can drag the circle in the middle of the text to set the direction of the light source.
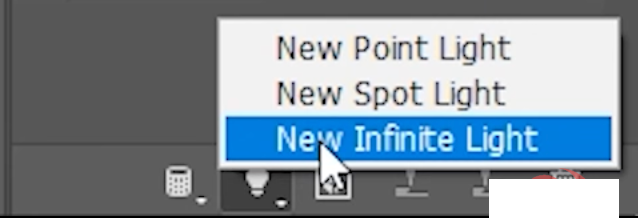
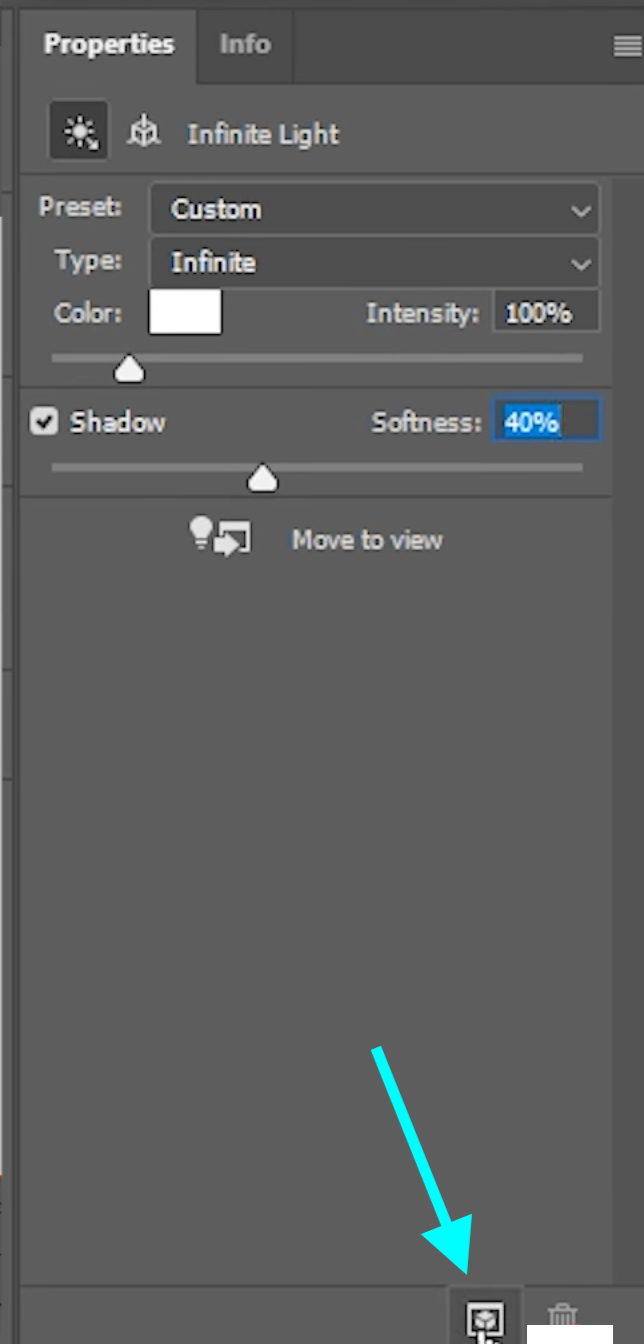
Step8 You can now go to the Properties panel to adjust the 3D effects and light source effects even further. When you are done, simply click this highlighted button to render your creation.
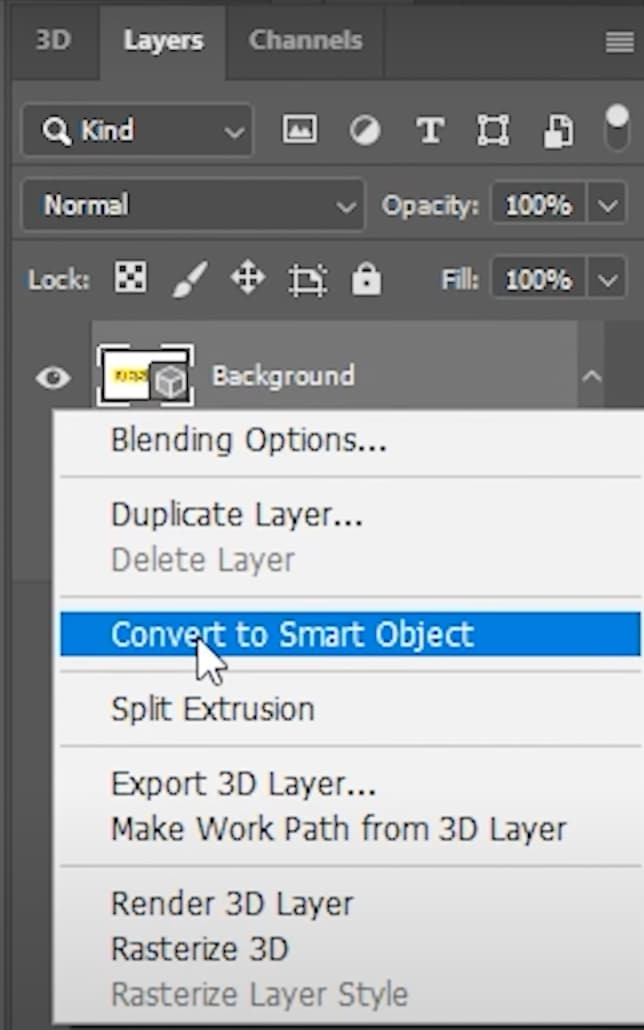
Step9 We’re almost done. The next step is to go back to the Layers tab → right-click on the Background layer → click on “Convert to Smart Object”.
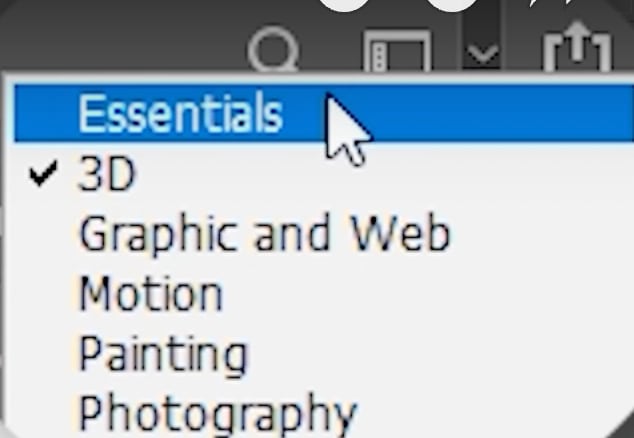
Step10 Finally, from the upper-right corner drop-down button, select Essentials.
There you have it. You can now export your 3D text image from Photoshop and you’re done. Congratulations on learning how to make a 3D text effect in Photoshop.
An Easier Way to Create a 3D Text Effect or Animation
As we mentioned, Photoshop may get challenging to use, especially for complete beginners. What if there was an easier tool you can use and still get the same high-quality and professional-grade results?
There is. It’s called Filmora . With this tool, you can create unique images, apply effects, edit complete videos from start to finish, and export everything in the highest quality formats possible.
Free Download For Win 7 or later(64-bit)
Free Download For macOS 10.14 or later
Compared to Photoshop, Filmora is not only easier to use, but it’s significantly more affordable as well. With that said, let’s find out how you can create a 3D text effect in Filmora.
How to Make a 3D Text Effect in Filmora
The steps are extremely simple. Just follow each exactly as you see it here and you will be done in no more than 5 minutes.
Step1 First, you should download Filmora and install the program on your computer. Then, launch it and click on New Project.

Step2 Import a background video or image by going to My Media and selecting Import Media. From here, select any clip or image you want and hit Open. When it’s imported, simply drag the clip to the Timeline below.

Step3 Next, head over to Titles and search for “3D”. Select any option you like and drag it to the Timeline, above your background clip.

Step4 Lastly, double-click on the 3D Title clip in the Timeline and edit its settings. Type in your custom text, change its font, color, and other features.

That’s it! Congratulations!. You’ve created a 3D text effect with Filmora in just four simple steps.
Conclusion
Creating 3D text with Photoshop is a good idea if you already know how to use the tool. If not, it’s always smarter to use a simpler alternative that’s much easier to use. As long as you get the same professional results, there’s no reason not to use Filmora. In fact, there are many more benefits than drawbacks.
Free Download For macOS 10.14 or later
Compared to Photoshop, Filmora is not only easier to use, but it’s significantly more affordable as well. With that said, let’s find out how you can create a 3D text effect in Filmora.
How to Make a 3D Text Effect in Filmora
The steps are extremely simple. Just follow each exactly as you see it here and you will be done in no more than 5 minutes.
Step1 First, you should download Filmora and install the program on your computer. Then, launch it and click on New Project.

Step2 Import a background video or image by going to My Media and selecting Import Media. From here, select any clip or image you want and hit Open. When it’s imported, simply drag the clip to the Timeline below.

Step3 Next, head over to Titles and search for “3D”. Select any option you like and drag it to the Timeline, above your background clip.

Step4 Lastly, double-click on the 3D Title clip in the Timeline and edit its settings. Type in your custom text, change its font, color, and other features.

That’s it! Congratulations!. You’ve created a 3D text effect with Filmora in just four simple steps.
Conclusion
Creating 3D text with Photoshop is a good idea if you already know how to use the tool. If not, it’s always smarter to use a simpler alternative that’s much easier to use. As long as you get the same professional results, there’s no reason not to use Filmora. In fact, there are many more benefits than drawbacks.
Also read:
- [New] Comprehensive Tutorial for Periscope Proficiency
- [New] In 2024, OBS and Wirecast Bout Which Broadcast Tool Is King?
- [Updated] Comprehensively Understanding Manual Signal Recognition for 2024
- [Updated] Essential Apps for Annotating Mobile Images for 2024
- [Updated] In 2024, Evaluating the Storage Power of 64/128GB Units for Vids
- [Updated] Join the Metaverse Meme Movement Funny, Fresh & Easy-to-Create Content
- 简单解决方法:处理文件被移除后重新显现的难题——7种方式
- Erläutern Sie Die Ursachen Für Das Kontinuierliche Disappearance Ihrer Externen Festplatte
- How to Screen Mirroring Oppo A78 5G to PC? | Dr.fone
- In 2024, A Detailed VPNa Fake GPS Location Free Review On Vivo Y77t | Dr.fone
- New VN Video Editor Android Review Features, Pros, and Cons
- Score Amazing Deals on iPads Right Now
- Secrets for Obtaining Copyright-Free Imagery
- Secure Swift Airdrop Connections on All Apple Devices - Fix Guide for 2024
- The Ultimate Tutorial for Updating Your SignatureX Password
- Top Portable Audio Choices Decoded for 2024
- Wireless Woes, Fixed with Switch Tips
- Title: [New] Step-by-Step Approach to Crafting 3D Text in Photoshop
- Author: Kenneth
- Created at : 2024-10-08 08:27:40
- Updated at : 2024-10-13 04:48:05
- Link: https://article-helps.techidaily.com/new-step-by-step-approach-to-crafting-3d-text-in-photoshop/
- License: This work is licensed under CC BY-NC-SA 4.0.